|
[Extracted from ActiveState Komodo 3.5 documentation]
This tutorial assumes:
-
ActiveTcl 8.3 or greater is installed on your system. ActiveTcl is a free
distribution of the Tcl language.
- You are interested in Tcl. Previous knowledge of Tcl is not required as
this tutorial walks you through a simple program. Further Tcl resources are
suggested later.
- Komodo Professional is required for the
Editing the GUI section of this tutorial.
Komodo Professional includes the GUI Builder component, which is required
for editing Tcl GUIs. To upgrade to Komodo Professional, see
ActiveState Komodo for more information.
- Open the Tcl Tutorial
project file
- Use Tcl Editing Features
- Edit the GUI,
by making changes to the dlg_tcl_check.ui file. Komodo Professional
is required for this section of the tutorial.
- Add callback code
by running the program.
- Debug the program
using the Komodo debugger.
On the File menu, click Open|Project
and select tcl_tutorial.kpf from the tcl_tutorials
subdirectory. The location differs depending on your operating system.
Windows
<komodo-install-directory>\lib\support\samples\tcl_tutorials
Linux
<komodo-install-directory>/lib/support/samples/tcl_tutorials
Mac OS X
<User-home-directory>/Library/Application Support/Komodo/3.x/samples/tcl_tutorials
All files included in the tutorial
project are displayed on the Projects tab in the Left Pane.
The following components are included in the tcl_tutorial.kpf
project file:
- dlg_tcl_check.ui: The GUI builder project. GUI builder
projects are stored with Komodo project files (.kpf) and carry a
.ui file extension. This project contains two associated files,
dlg_tcl_check.tcl and dlg_tcl_check_ui.tcl.
- dlg_tcl_check.tcl: A callback file. Only this file
should be edited. Generated automatically when
a new GUI
Builder project is created.
- dlg_tcl_check_ui.tcl: This file is overwritten each
time modifications are made to a GUI Builder project. For this reason,
any changes made to this file could be lost. Generated automatically when
a new GUI
Builder project is created.
On the
Projects tab, click the plus sign next to dlg_tcl_check.ui to
display its contents. Double-click the file dlg_tcl_check.tcl. The
dlg_tcl_check.tcl file opens in the Editor Pane; a tab at the top of
the pane displays its name.
All Komodo editing features are available when programming in Tcl. The
examples and simple exercises below provide an introduction to these
features.
Komodo detects keywords in a Tcl program and applies coloring that makes it
easier to quickly identify specific elements. For example, in
dlg_tcl_check.tcl, on line 36, notice that the set
command is a different color from the strings normal and
disabled. Use the Fonts and Colors Preferences
dialog box (Edit|Preferences|Fonts and Colors) to specify
custom coloring for these and many other Tcl elements.
Komodo helps to make programming faster by displaying available
methods for Tcl commands. Komodo also displays the list of arguments that can be
passed to a called function.
- On a blank, uncommented line in the file dlg_tcl_check.tcl,
enter the following:
str
After typing the "r", Komodo lists all methods beginning with str.
Use the mouse or the up and down arrow keys to scroll through this list.
- Continue typing until your entry reads:
string is
Notice that the list reduces to the available methods only. Move
through the list using the mouse or the up and down arrow keys.
- From the drop-down list, select string is alnum, and
then press the Tab key. Komodo completes the rest of the
method name. This is
AutoComplete.
- Type a space after
string is alnum. Komodo lists the
arguments for calling the string. This is a
CallTip.
Komodo checks for syntax errors while you are programming. Komodo identifies
syntax errors by displaying red and green wavy lines below the code. Syntax errors
are underlined with a red wavy line; syntax warnings are underlined with a green
wavy line. Notice the text typed in the previous step, string is alnum,
is underlined with a red wavy line. Position your cursor on the red line to display
a warning message on the status bar. See
Background Syntax Checking in the Editor documentation for more information.
Delete string is alnum.
Collapse and expand blocks of code to view or analyze code structure.
- On line 93, click the "-" sign to the left of the Komodo Editor Pane
to collapse this block of code. Notice that the "-" sign becomes a
"+" sign.
- Click the "+" sign. The block of text expands again.
Use Komodo GUI Builder features to add or remove widgets, or to modify the
properties of existing widgets. Komodo Professional is required for this
section of this tutorial. Komodo Professional includes the GUI Builder
component, which is required for editing Tcl GUIs. To upgrade to Komodo
Professional, see
ActiveState Komodo for more information.
GUI builder projects are stored with Komodo Project files and carry a
.ui file extension. The project file used in this tutorial is
dlg_tcl_check.ui. To open the project:
- Open the Tcl Tutorial Project,
if it is not already open.
- On the Projects tab, right-click
dlg_tcl_check.ui, and select Edit Dialog.
The GUI Builder application launches, and the dialog box is displayed
in the GUI Builder workspace.
When creating a new GUI Builder project, you are prompted to
specify a target language and version. Different widgets sets are displayed on
the Widget Palette, depending on the language and version selected. View
properties of a project by selecting Project Settings
from the GUI Builder's File menu.

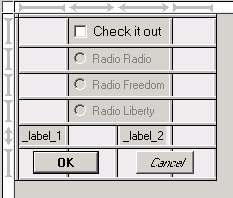
Widgets are added to a dialog from the Palette tab or the
Menu tab. In this step, you will add label widgets to
the GUI.
- On the Palette tab, click the label
widget.
- Click in the cell in the first column of the fifth row. The label widget
is added.
- On the Palette tab, click the label
widget again.
- Click in the cell in the third column of the fifth row. Another label
widget is added.

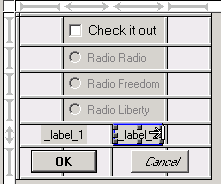
Resizing widgets can involve spanning multiple columns, rows, or
changing column or row width or height. To resize the label widgets:
- Click the label widget in the first column.
- Position the mouse pointer at the right of the label such that the
pointer changes to an arrow pointing toward a line, and then drag to the
right to expand the label widget across two cells.
- Repeat for the label widget in the third column.

Widget properties define the display characteristics of individual widgets.
Common widget properties are accessible on the GUI Builder toolbar; the complete
set of properties is accessible by double-clicking the widget.
- Click the label widget that spans the first two columns. In the
Text field on the toolbar, enter "Now Playing:", and click
the "B" (Bold) button to the right.
- Double-click the label widget that spans the last two columns. Remove the
contents of the -text field. (This is the same as clearing
the contents in the Text field on the toolbar.) Notice
that the value of the -text field is, by default, the
same as the name of the widget (as shown in the field at the top of the
properties page). The widget name itself is used in the callback code you
will add in the next step.
- Click Apply.
- Click OK.

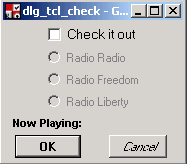
Use the GUI Builder test feature to generate output and preview the
user interface.
To build the project:
- Select Commands|Start Test, or click the green button
on the GUI Builder toolbar.
- A dialog box prompts you to save the project. Click Save.
- The GUI is generated. Review the results.

Callback code assigns programmatic actions to the components configured in
the GUI. In this step, you will add code that displays a different message
in the second label depending on which radio button is selected.
Each dialog project in Komodo contains two files. One file (with a
_ui suffix in the file name, in this case dlg_tcl_check_ui.tcl)
is regenerated each time the GUI Builder is run. Therefore, user code should
never be placed in this file. The other file (without the _ui suffix,
dlg_tcl_check.tcl) is used to store the user code, which is
preserved regardless of future edits to the dialog.
In the GUI Builder, select Commands|View Code. The
dlg_tcl_check.tcl file opens in the Komodo Editor Pane.
In this section, you will add code that displays a different message
in the label widget depending on radio button selection.
- On line 49, insert a line after the opening brace and enter the following:
    variable BASE
    $BASE._label_2 configure -text "Free Bird"
}
- On line 61, insert a line after the opening brace and enter the following:
    variable BASE
    $BASE._label_2 configure -text "The Liberty Sessions"
}
- On line 73, insert a line after the opening brace and enter the following:
    variable BASE
    $BASE._label_2 configure -text "Radio Killed the Video Star"
}
Note that the text is associated with the widget by specifying the widget
name in the $BASE._label_2 statement, where _label_2
is the name of the widget. To determine the name of a widget, double-click the
widget in the GUI Builder and refer to the field at the top of the
properties page.
This section reviews how to add breakpoints to the program and "debug" it.
Adding breakpoints lets you to run the program in parts, making it possible to
watch variables and view output as they are generated. Before you begin, be
sure that line numbers are enabled (View|View Line Numbers).
Open dlg_tcl_check.tcl in the Komodo editor (if it is not
already open).
- Set a breakpoint: Click in the gray margin immediately
to the left of the code on line 113 of the program. This sets a
breakpoint, indicated by a red circle.
- Run the debugger: Select Debug|Start. In
the Debugging
Options dialog box, click OK to accept the defaults. The
debugger processes the program until it encounters the first breakpoint.
Komodo Tip: Debugger commands
can be accessed from the Debug menu, by shortcut keys, or
from the Debug Toolbar. For a summary of debugger
commands, see the
Debugger
Command List. |
- Watch the debug process: Notice that a yellow arrow
appears on the breakpoint. A yellow arrow indicates the position at which
the debugger has halted.
- Line 113: Step In: Select Debug|Step In.
"Step In" is a debugger command that causes the debugger to execute the
current line and then stop at the next processing line. In this case,
the debugger opens the GUI definition file (dlg_tcl_check_ui.tcl).
This file initializes the graphical elements in the applications.
- Line 23: Step Out: Select Debug|Step Out
to run the rest of the code in dlg_tcl_check_ui.tcl. The debugger
stops on line 118 in dlg_tcl_check.tcl.
- View variables: In the
Bottom Pane, click the Debug tab. On the left side
of the Bottom Pane, click the Global tab. Right-click
the
$example_radiobutton variable, and then select
Add to Watch.
- View watched variables: On the Watch
tab, notice the
$example_radiobutton variable is listed.
- Line 118: Step In: Click the Global
tab. Select the
$example_radiobutton variable. Select
Step In. Line 118 launches the Tcl application.
Note that the debugger appears to be inactive (for example, no yellow arrow
indicates the current debugger position). The debugger is waiting for
action from the application.
- Click "Check it out": Click the "Check it out"
check box in the application. The debugger moves to line 35.
- Set a breakpoint: Click the gray margin on
line 39 to set a breakpoint.
- Line 35: Run Select Debug|Go/Continue.
The debugger stops on line 39.
- Line 39: Step In: Select Debug|Step
In. Focus returns to the application. Click the
Radio Liberty radio button. The debugger moves to line 62.
Notice that the
$example_radiobutton variable on the
Watch tab now has the value "liberty". This association is
defined in the dlg_tcl_check_ui.tcl file.
- Line 62: Step Into: Select Debug|Step
In until line 63 is executed. This returns focus to the
application, and writes "The Liberty Sessions" text to the label.
- Click OK: On the application, click OK.
This stops the debugger.
Komodo Tip: What do the debugger
commands do?
- Step In: Executes the current line of code and
pauses at the following line.
- Step Over: Executes the current line of code. If
the line of code calls a function or method, the function or method is
executed in the background and the debugger pauses at the line that
follows the original line.
- Step Out: When the debugger is within a function
or method, Step Out executes the code without stepping
through the code line by line. The debugger stops on the line of
code following the function or method call in the calling program.
|
ASPN, the ActiveState Programmer Network
ASPN, the
ActiveState Programmer Network, provides extensive resources for Tcl
programmers:
- Free downloads of ActiveTcl, ActiveState's Tcl distribution
- Searchable Tcl documentation
- Trial versions of the Tcl Dev Kit
Documentation
There is a wealth of documentation available for Tcl. The first source for
language documentation is the ActiveTcl distribution installed on your system.
The "doc" directory contains the ActiveTcl User Guide and Documentation Index.
To view ActiveTcl documentation:
- Locate the ActiveTcl distribution on your system (by default,
C:\Tcl\doc on Windows)
- Double-click to open the file ActiveTclHelp.chm.
Tutorials and Reference Sites
There are many Tcl tutorials and beginner Tcl sites on the Internet,
for example:
- Tcl Developer Xchange
- The Tcl'ers Wiki
|


